


10,72 € 7,61 € 4,95 € Versandkosten Gesamt 12,56 €

Hervorgehoben
|
|
10,72 €
7,61 € |
Zum Shop
|

|
8,90 € |
Zum Shop
|
| ALLE WEBSHOPS VERGLEICHEN (2) | ||
 Beschreibung
Webshops vergleichen (2)
10,72 € 7,61 € 4,95 € Versandkosten Gesamt 12,56 €
8,90 € 3,50 € Versandkosten Gesamt 12,40 €
Shops mit anderen Größen
Beschreibung
(2)
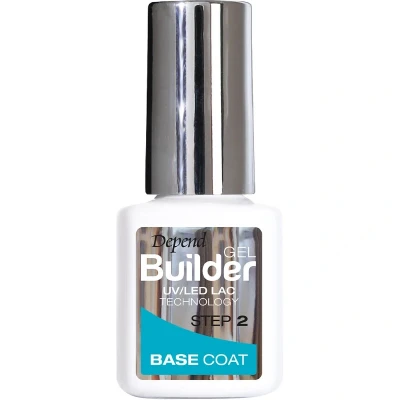
Depend Cosmetic Gel Builder Base Coat Step 2 ist ein transparenter Unterlack, der vor dem Depend Gel Builder aufgetragen wird. Er wird dünn aufgetragen und zweimal für je 30 Sekunden unter der Gel iQ UV/LED-Lampe ausgehärtet. Anschließend ist der Nagel bereit für den Gel Builder. Dieser Unterlack ist der zweite Schritt der Depend Gel Builder-Behandlung. Er lässt sich schnell und einfach auftragen und sorgt für ein wunderschönes Ergebnis mit fantastischem Glanz und Fülle. Die Anwendung erfolgt in 4-5 einfachen Schritten mit folgenden Produkten: - Schritt 1: [Gel Builder Cleanser Step 1 & 5](/depend-cosmetic-gel-builder-cleanser-step-1---5---35-ml.html) - Schritt 2: Gel Builder Base Coat Step 2 - 5 ml - Schritt 3: [Gel Builder Step 3 - 5 ml](/depend-cosmetic-gel-builder-step-3---5-ml---clear.html) in Ihrer Wunschfarbe - Schritt 4: [Gel Builder Top Coat Step 4 - 5 ml](/depend-cosmetic-gel-builder-topcoat-step-4---5-ml.html) - Schritt 5: [Gel Builder Cleanser Step 1 & 5](/depend-cosmetic-gel-builder-cleanser-step-1---5---35-ml.html) (Diesen Schritt können Sie überspringen, wenn Sie [Gel Builder] verwenden.) [Depend Cosmetic Gel iQ Mini UV/LED Lampe + Adapter](/depend-cosmetic-gel-builder-top-coat-step-4---5-ml.html)) – Sie müssen Ihre Naturnägel weder feilen noch mit einem starken Primer behandeln, was die Nagelqualität beeinträchtigen kann. Gel Builder benötigt lediglich eine leichte Reinigung mit einem milden Pre-Cleanser vor dem Lackieren. Bei korrekter Anwendung sorgt Gel Builder für ein wunderschönes Ergebnis, das bis zu 3 Wochen hält. **Vorteile:** - Unterlack - Vorlack für Gel Builder - Transparent - Härtet 2 x 30 Sekunden unter der Gel iQ UV/LED-Lampe aus - Hält bis zu 3 Wochen - Vegan **Anwendung:** - Detaillierte Anweisungen zur Anwendungstechnik für Nagelverstärkung und -verlängerung finden Sie in der Gebrauchsanweisung des Depend Cosmetic Gel Builder Start Kits. - Tragen Sie die Lacke nur auf die Nageloberfläche auf, nicht auf die Nagelhaut oder die umliegende Haut. - *WICHTIG:* Falls Unterlack, Gel Builder oder Überlack auf die Haut um die Nägel gelangt, entfernen Sie ihn **VOR** dem Aushärten mit einem Cleanser auf einem Wattestäbchen. *Vorbereitung:* - Feilen Sie Ihren Naturnagel mit einer feinen/mittleren Feile in die gewünschte Form oder feilen Sie ihn glatt, damit er auf die Tips passt, wenn Sie Nagelverlängerungen anbringen möchten. - Schieben Sie die Nagelhaut mit dem Manikürestäbchen zurück und entfernen Sie abgestorbene Hautschüppchen von der Nageloberfläche. *Nagelverlängerung mit Tips:* - *Wenn Sie nur eine Nagelverstärkung wünschen, fahren Sie mit Schritt 1 fort - Reinigung* - Wählen Sie die Nagelgröße. Passende Nagelspitzen – Reinigen Sie Ihre Nägel mit Nagellackentferner. – Bereiten Sie die Nagelspitzen vor und kleben Sie sie gemäß der Gebrauchsanweisung auf die Nägel. *Schritt 1 – Reinigung:* – Geben Sie Nagellackentferner auf ein Wattepad. – Reinigen Sie den Nagel sorgfältig. – Lassen Sie ihn ca. 30 Sekunden trocknen, bis er vollständig trocken ist. – Berühren Sie die Nageloberfläche nach der Reinigung nicht. ***Schritt 2 – Unterlack:*** – Vermeiden Sie den Kontakt mit Haut und Nagelhaut. – Tragen Sie eine dünne Schicht Unterlack auf. – Härten Sie ihn 2 x 30 Sekunden lang unter der UV/LED-Lampe aus. *Schritt 3 – Aufbaugel (jeweils an einem Nagel):* – Vermeiden Sie den Kontakt mit Haut und Nagelhaut. – Tragen Sie eine dünne Schicht Aufbaugel auf den Nagel (und die Spitze) auf, nicht aushärten. – Tauchen Sie den Pinsel erneut in das Gel und tragen Sie es in Form eines Strangs entlang der Nagelmitte auf. – Bewegen Sie anschließend Ihren Finger in einem 45-Grad-Winkel auf und ab, um den perfekten Apex zu formen. Die Schwerkraft zieht das Gel dann nach unten und formt einen Bogen mit einem oberen Punkt (Apex), wo die beste Festigkeit und Balance auf dem Nagel erreicht wird. Bei Bedarf anpassen – 2 x 30 Sekunden aushärten lassen *Gel iQ Farbe (optional):* – Wenn Sie eine [Gel iQ Farbe](https://nicehair.dk/search?text=Depend%20Cosmetic%20Gel%20iQ%20Polish%20Step%203%20-%205%20ml) auftragen möchten, muss dies vor dem Auftragen des Top Coats erfolgen. – Jede Schicht muss 30 Sekunden aushärten. *Schritt 4 – Top Coat:* – Kontakt mit Haut und Nagelhaut vermeiden. – Eine dünne Schicht Top Coat auftragen und 2 x 30 Sekunden aushärten lassen. *Schritt 5 – Reinigung/Finish (Diesen Schritt bei Verwendung von Gel Builder No Wipe Top Coat überspringen):* – Stellen Sie sicher, dass Sie mindestens 12 Wattepads bereithalten. – Geben Sie eine großzügige Menge Cleanser auf ein Wattepad. – Legen Sie die feuchte Seite des Wattepads auf den gesamten Nagel und warten Sie 5 Sekunden. – Drücken Sie das Pad mit 2 Fingern an, um einen gleichmäßigen Druck auf die gesamte Nageloberfläche zu erzielen. Ziehen Sie das Wattepad mit einem festen Zug von der Nagelwurzel bis zur Nagelspitze ab. Wiederholen Sie den Vorgang für die anderen Nägel und verwenden Sie für jeden Nagel ein neues Wattepad. Befeuchten Sie ein neues
LykoCreate salon-quality nails at home in just a few simple steps! Change the shape of your nail, strengthen your natural nail or extend by adding tips. Using Gel Builder you can achieve strong, sturdy and long-lasting salon-quality nails that will last for up to 3 weeks. The starter kit includes everything you need to get started quickly and easily. When using Gel Builder, your nails only need light cleaning with Cleanser before starting your treatment. The UV/LED lamp has been developed specifically for the Gel Builder system and each coat should be cured for 2 x 30 seconds to guarantee safe and correct curing of material.The viscosity of the gel allows you to either extend or strengthen nails, yet it is also sufficiently fluid to be self-levelling. Once the Top Coat has been cured under the lamp, all you have to do is clean your nails using Cleanser. Your Gel Builder nails are now cured and dry with a fantastic shine and will stand up to hard knocks. Gel Builder can be removed using two different methods. Method 1 is a gentle option: the material is removed using a special vegetable oil and warm water. Method 2 is better suited to dry nails for which a remover may be needed. To remove overlays, you can use Method 1 or 2. We recommend Method 1 in the first instance, which works for most nail types. Otherwise we recommend Method 2. To remove extensions with a tip, use Method 2. Read through and follow all the instructions for use and the safety information carefully, and have everything you need to hand before you start the treatment. How to use: Gel Builder Starter kit (extensions, overlays)These How to use: include precise instructions for applying an overlay to a natural nail or an extension with a tip.Read through all the instructions and the safety information carefully. Follow them step by step and make sure you have everything you need to hand before you start. Keep these instructions for future reference.Only use the products indicated in the instructions and never mix with other brands.Use a Depend UV/LED lamp intended for Gel Builder products and ensure correct curing of the material.Do not use this product if:•You have previously experienced an allergic reaction after using UV/LED-cured nail products.•You are allergic to acrylates, as these products may cause an allergic reaction.•Your cuticles are split or damaged, etc. or if your nails are in poor condition (thin, dry or split).•You bite your nails or have short nails, where the tip of your nail (the top) ends below the skin of your fingertips.UV/LED lamp: Read through the separate instructions for the UV/LED lamp before using it. Do not look directly at the light from the UV/LED lamp when it is in use. Always unplug the lamp when you have finished applying the products. The lamp has a timer, which should always be set to 30 seconds. If curing for 60 seconds: press the 30-second button once, and when the lamp goes off, press the 30-second button once more. The lamp generates heat and may feel slightly hotter if you have thin nails or apply too thick a coat of gel to the nail. This will abate after treatment.Storing Gel Builder at homeGel Builder products are sensitive to light. Take care, therefore, to screw the top on immediately after use. Wipe the thread on the neck of the bottle, so there is less risk that the bottle will be difficult to open next time you use it.Store the products in a cool, dark place.How often can I apply Gel Builder?Gel Builder lasts for up to 3 weeks, and so we recommend not applying it more frequently than this. If you do, the effect on your nails is more severe, which may damage the quality of your natural nails. We also recommend that after removal you wait a week before applying Gel Builder again, and check your nails to ensure that they are in good condition. If not, then wait until they are in good condition again. Preparations before/after treatment:The products should be used indoors and must not be exposed to direct sunlight during the treatment. While applying products, protect the surface where you are sitting with a towel. Make sure there is plenty of ventilation as you work. Ensure you have good lighting. If you still have polish or traces of it on your nails, remove this using Depend Super Fast nail polish remover. Have cotton buds handy to be able to remove any unwanted product from the skin easily using Cleanser. In case of spillage on the lamp, bottle or top, clean with Cleanser and wash your hands thoroughly with soap and water.Application techniques – general:To avoid getting the polish on your skin, we recommend that you always:-Ensure you have plenty of light and a good posture for applying the products.-Leave a decent safety margin around the cuticles, taking particular care when applying transparent products, as these are more difficult to see.-Stroke the brush against the inside of the neck of the bottle when applying the Base Coat and Top Coat, to avoid getting too Depend Gel Builder Bas
 Produktspezifikationen
| Marken | Depend Cosmetic |
|---|---|
| Kategorie | |
| EAN |
|
| Farbe |
|
| Größe |
|
| Geschlecht |
|
| MPN |
|
 Preis-Historie
Preise zuletzt aktualisiert am:
 Verwandte Ergebnisse


